The Power of a Pumpkin
Welcome to Kidspace’s Thirteen Days of Halloween! We can’t wait to celebrate the season with you. Halloween tricks, treats, and traditions are full of play, imagination, and opportunities to learn and grow.
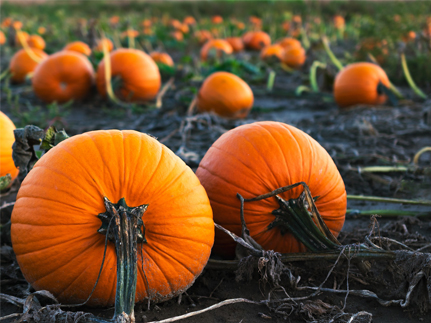
It’s always exciting to see pumpkins arrive at the market this time of year, but how do they get there? Teaching kids about where food comes from and engaging them in the process of growing and buying it can help put them on track for a lifetime of healthy food choices. Pumpkins are definitely the celebrity fruit of the season, a must-have fall essential for decorations, treats, and more. Below are just a few ideas to PUMPkin up the learning at home this Halloween!
Pumpkin Dissection
Take a deeper dive into pumpkins (literally!) with this Pumpkin Dissection activity where we’ll explore pumpkin parts to learn more about what makes a fruit a fruit. On your way to carving your jack-o’-lantern this year, take a closer look as you dissect it to discover clues that tell us it’s a fruit, not a vegetable!
Paying attention during pumpkin carving helps kids practice skills such as observation, investigation, and communication, which support the development of scientific literacy. Sparks curiosity and interest about fruits and vegetables through a hands-on sensory experience as kids explore the pumpkin through smell, sight, sound, texture and even taste!
What is the difference between a fruit and a vegetable? Hint: Not all fruits are sweet! Botanists (scientists who study plants) classify the pumpkin as a fruit, because it develops from a flower and contains seeds. Tomatoes, peppers and cucumbers are all fruits too! Vegetables are any other part of the plant, like the roots (carrots), leaves (lettuce), or stems (celery). In the culinary world, most savory tasting plants, even ‘technical’ fruits like tomatoes and cucumbers, are included in the same category as vegetable, even though they aren’t.
 Supplies
- Pumpkin
- Knife or pumpkin carving tool (we like the ones that come in a carving kit)
- Adult support
- Optional investigation tools:
- Measuring tape
- Scale
- Magnifying glass
- Paper and writing utensils
Directions

Stem
While the pumpkin is growing, its stem is attached to a vine that carries nutrients to the pumpkin.
What shape is the stem on your pumpkin? How might its texture be different than the rest of the pumpkin?
Skin
The skin is the thin, often shiny, outer layer of a pumpkin. Cultivated varieties of pumpkin come in many colors including orange, white, green, pink, and even blue! The tough outside skin of a pumpkin is also called the rind and it helps protect the pumpkin from insects and disease.
How might you describe the texture and color of your pumpkin’s rind? It is the same color all over? Why do you think there might differences in color?
Ribs
These are indents or grooves that run from the top to the bottom of the pumpkin. Some pumpkins have very distinct ribs, others have almost none.
What are the ribs on your pumpkin like? How many are there? Are they deep or shallow?
Blossom End
This is the small spot or scar on the bottom of your pumpkin where the flower used to be. Pumpkins are fruit and grow from a flower that has been pollinated.
How does the blossom end look different or similar to the stem? Can you think of other fruits in with a blossom end on them?
Cutting open the pumpkin
Before cutting open the pumpkin, make some predictions. What might the inside of the pumpkin look or feel like? Will it be hollow? What might be inside? Cut the pumpkin either in half (if you are going to cook with it) or cut the top off (if you are going to make a jack-o-lantern). What do you notice? Does it support the predictions?

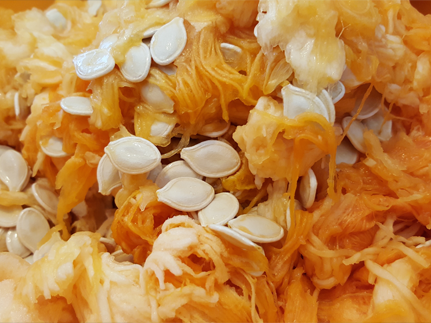
Seeds
Every pumpkin grows from a single seed! When a seed is planted, moisture and nutrients from the soil will help the seed to grow into a pumpkin. The outside of a seed is called the seed coat, and can carefully be peeled back to find the germ, the part that grows into a bigger pumpkin.
How many seeds do you estimate are inside the pumpkin? Try counting them to see if you were right! Are all the seeds the same size?
Strands
These are the stringy parts that attach to the seeds. They can be so slimy, that people often call them the ‘guts’ of a pumpkin.
See if you can pull apart individual strands of the pumpkin. How might it change its consistency or texture?
Pulp
The pulp is part of the pumpkin fruit that we eat, and is often called the ‘meat’ of the pumpkin. This is what is used to cook soups, pies, bread, and other yummy treats!
Does the pulp look dry or wet? Is it the same color throughout? What happens if you try and scrape it?
Seeds to Grow On
This activity is just one way to explore plants through pumpkins — here are some other ideas to explore where food comes from and how it grows!
Take your dissection skills and use them to explore other veggies at the market! Can you figure out if a something is a fruit or a vegetable? Can you discover similar structures that help give you clues?
Explore the life cycle of pumpkin and plants through stories! Some of our staff favorites include:
- Big Pumpkin by Erica Silverman
- From Seed to Pumpkin by Wendy Pfeffer
- The Biggest Pumpkin Ever by Steven Kroll
- Ready for Pumpkins by Kate Duke
- Pumpkin Patch by Elizabeth King
Next year, explore the entire life cycle of a pumpkin by growing them at home. Get them started around May to go from seed to full pumpkin. Here is a great resource to bookmark for 2021. In the meantime, stay tuned for some ways to explore decay.
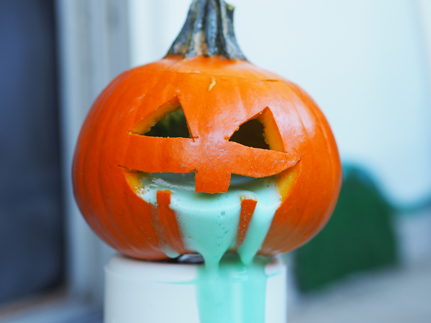
Pumpkincano
Have a blast creating a Pumpkincano, a pumpkiny twist on a classic chemical reaction using baking soda and vinegar. This is a fun and messy way pumpkins can be used to continue to support skill-building and to develop scientific thinking by exploring experimentation and making predictions. But also, how often do you have the opportunity to make a pumpkin erupt with fizzy bubbles?!
 Supplies
- Jack-o’-lantern
- Container that fits inside your pumpkin (e.g., a glass, mug, or ramekin)
- Large measuring cup or bowl with a spout
- 1 cup vinegar
- 1 tablespoon baking soda (sodium bicarbonate)
- ½ cup liquid dish soap
- Rimmed baking sheet
- Optional:
- Food coloring
- Paper and a writing utensil
 To Explode Explore
- Put baking soda in the container that will go inside your pumpkin.
- In a separate container, mix the vinegar and liquid dish soap, and optional food coloring.
We used a small pie-pumpkin, you may want to double or triple the recipe for larger pumpkins and upgrade your catchment container to a larger size!
- Place your jack-o’-lantern on the baking sheet and place the cup with baking soda inside.
- Now, make a prediction – what might happen when we add the vinegar solution to the baking soda in the pumpkin? Where will it come from?
- Pour vinegar solution and observe what happens!

This exploration features a chemical reaction between baking soda and vinegar. Chemical reactions occur when two or more chemicals combine together to make a completely new product. One of the tell-tale signs of a chemical reaction is when the mixture produces bubbles! In our experiment, baking soda combines with vinegar to create an entirely new substance (carbonic acid and sodium acetate) resulting in that awesome, and messy fizzy eruption!
Extend the Learning
Continue to experiment and predict what will happen when changes are made! There are tons of ways to change this experiment to see what happens. Here are just a few ideas to get you started:
- What might change if more or less baking soda is added?
- What might happen if the vinegar is poured in quickly vs. slowly?
- Does the type of vinegar make a difference?
- What might happen if you don’t use dish soap in the recipe?
- Does the shape or size of the container for the baking soda change anything?
Pumpkin Luminary
Get creative making a Pumpkin Luminary, using recycled jars and tissue paper to give your Halloween decorations a little glow-up! One of our favorite parts about Halloween are the decorations! We enjoyed making this jack-o-lantern inspired luminary out of recycled glass jars and tissue paper. It was the perfect combination of creative messy fun with a lot of room for interpretation and it made for a pretty decoration at night.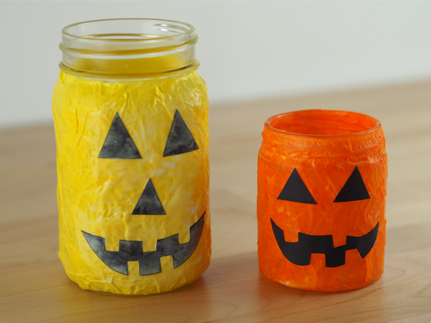
You get to spend time creating together. This promotes a growth mindset as kids make and find ways to improve their craft. This activity leaves lots of room to play around with different techniques to get the desired outcome, from how to apply the glue, how many layers of tissue to add, and how shapes and colors combine and overlap.
Supplies
- Tissue paper – colors of your choice! We went with a classic orangey jack-o’-lantern, but the world is your pumpkin guts (it’s the Halloween equivalent of oysters!?). Helpful hint – this is a great activity to use wrinkled recycled tissue paper from things like gift bags!
- Recycled glass jar. Look to your recycling bin or keep an eye on things in the fridge you will be using up soon. When the perfect jar is acquired, wash it out and remove the label. Try to get off as much paper as you can, but if you can’t get all the adhesive off, that is totally okay.
- Scissors
- White glue (or Mod Podge glue if you have it)
- Old paint brush or sponge
- Black paper, black paint, or marker pen to create your face
- Paint brush or sponge
- Votive candle (other small light sources work well too – such as fairy lights)
Preparation
- Cut or tear about 2 sheets of tissue paper into small, variously sized and shaped pieces.
- Cut out black paper in the shapes you would like to create your jack-o’-lantern face. Optional: You can skip this step and draw your face on using a marker!
Directions
- In small sections at a time, use your paintbrush or sponge to apply lots of glue to a small section of your jar – then apply tissue paper pieces over glue and press down.
 Continue to work around the jar, adding glue and tissue paper in about 2-3 layers to your specifications. You can skip papering the bottom of the jar.
- If you are using paper to create your face, add this to the wet gluey surface of your jar, before it dries (of course, add more glue if needed) and add glue over the top of the paper.
- If you are using marker, wait for the jar to dry, then draw it on!
- Place a small candle or light inside and watch your lantern glow!
Extend the Learning
What more can you make? Try using the same technique to make other Halloween-related characters such as ghosts or monsters.
Explore shapes and colors. What happens when different colors and shapes are overlapped? What if you use all the same shape?
To view all our Halloween blogs and more, click here.
 This program is supported, in part, by the Los Angeles County Board of Supervisors through the Los Angeles County Department of Arts and Culture.